
Hull Sealing
When the work is completed the trust hopes to display the lifeboat, its primary aim is to raise much needed funding for the RNLI. When conditions allow it is quite feasible that the lifeboat may even take to the water and from the outset the trust has considered that in order to do so the hull would have to be effectively watertight. At a general meeting members it was the general consensus that coating the hull with an Epoxy coating seemed the best way forward and that a number of companies should be approached in an effort to find the correct solution. Of the companies we approached who specialise in Epoxy coating products West Systems seemed to be genuinely interested in our project. The company seemed to interested in helping us and presented a sample of the epoxy resin and the thin sheathing (a resin suitable matting). With a genuine interest in our project West Systems agreed to send one of their representatives to Whitby to have a look at the boat. In doing so they could then give us a more definitive idea of the complexities of sealing the hull. From the outset they have been professional in their approach and have an enthusiasm for what we are trying to do. It was later revealed that in the past they have been involved with a similar restoration project and this knowledge helped us to confirm them as the ideal candidate.
A representative from West made a visit to the barn so that he could get an idea of what the trust was trying to achieve. There were some discarded wooden parts left over from the "Edward and Eliza", which proved ideal for the representative to gave a demonstration of the capabilities of the epoxy as a suitable sealant for the hull. The first order was duly made as the restoration was moving ever swiftly forward. Before attempting the resin application the trust sought advice from a number of sources so as to prepare the hull for the resin and matting. The very nature of the work is such that it was not something that could be easily repaired if a mistake was made. The trust was advised to remove any old caulking between the boat planking before applying any resin so as to avoid any danger of the resin reacting to it. It was an extremely arduous task as the caulking had obviously been there for many years without any attention. On one of my trips to the boat I spotted Tim hard at work on what was a very slow task, it was clear that removing all the caulking was going to be hard going. A few tools were used to try and gouge out the caulking without causing any undue damage to the timber. Some of the the cadets that visited the project earlier in the year had made a start on removing the caulking, but there was still plenty to remove.
Working With Resin
Sometime before tackling the resin on the lifeboats hull selected team members had already tried the resin out on timber left over from the Edward & Eliza. It was important to get the right quantities of resin and hardner right, too little hardner and the mix will not cure or harden, whereas the resin will cure or harden very quickly if too much hardner is used in the mix.
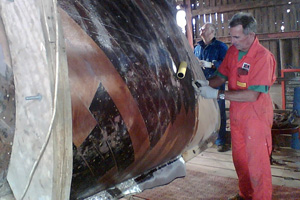
Working with resin is best done during a spell of mild weather as heat also makes up an important part of working with resin. With a favourable forecast expected a work day was organised to begin working with the resin. To avoid having to constantly roll the boat it was decided that the best way of doing it was to complete one side at a time. A small batch of the resin was made up and the volunteers began the task of applying the first base coat to the boats hull. Rollers and brushes were used to apply the resin ensuring that the resin penetrated between the planking strips, it was soon found that the resin acted as an ideal solution for filling small gaps or indentations. Once coated the boat looked quite nice with a varnish look to it as can be seen in the photograph above.
The Matting
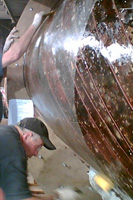
Whilst it is possible that the resin alone may have prevented any water ingress that trust was advised to complement the resin with matting. The matting would not only ensure the hull was watertight but it would also help to strengthen the hull, something the trust thought to be worthwhile given the age of the boat. As the boat is transported to and from exhibitions the extra strength from the matting would prove vital, as an added bonus the resin and matting would help produce a good base when it came round to preparing the boat for painting. Once the resin had completely dried and hardened another session was organised to begin adding more resin and the matting. Strips of matting were cut, and a fresh batch of resin made up. The resin was liberally rolled onto the hull and as the next section was wetted a sheet of matting was laid on top of the wet resin.
Even with the boat rolled over for easier access it was still a complex job to overlay the matting, it was essential that the matting was laid in such a way that the following sheets could be neatly laid. Once the laid the matting was checked to make sure that it was absorbing plenty of resin, it was important to make sure it was wet enough without being over saturated A plastic spatula was then dragged down the matting to remove any excess resin and make sure there was no air pockets or trapped bubbles, if left they would harden and be blatantly visible. The plastic scrapers were only a couple of inches wide and it was a lengthy task to slide them down the matting without disturbing it
The wooden templates used to roll the boat undoubtedly made things easier but as the matting was applied there were times when they got in the way. As the resin was being applied it was easy to think things were going well, however a batch with the wrong mixture swiftly refocused everyone's attention.
Hardened Resin & Matting
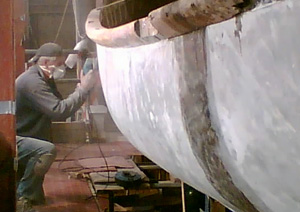
With one side completed it was left to fully harden and even with mild weather it was not going to fully cure for some days. One side of the boat took on a curious look as the resin completely hardened. The boat was rotated and the process repeated. Having completed the other side it was a little easier, although still quite an undertaking. After leaving it to fully harden it was then considered appropriate to remove the wooden structures that had served the project extremely well. As they were removed the boat began to take on a more familiar shape and in many ways it was big step forward in the restoration process.
Once the resin had completely dried out it had turned a shade of gray and could be sanded back to a smooth finish required to paint the hull. it was a really dusty job to do and without power tools it would have taken a long time to do. As the sanding was being done elsewhere sheets of matting were cut in readiness for tackling the areas left when the wooden templates were removed. Once these were covered the boat underwent a thorough inspection and allowed to dry the boat was then considered externally watertight.
Copyright © Colin Brittain 1999 - 2022